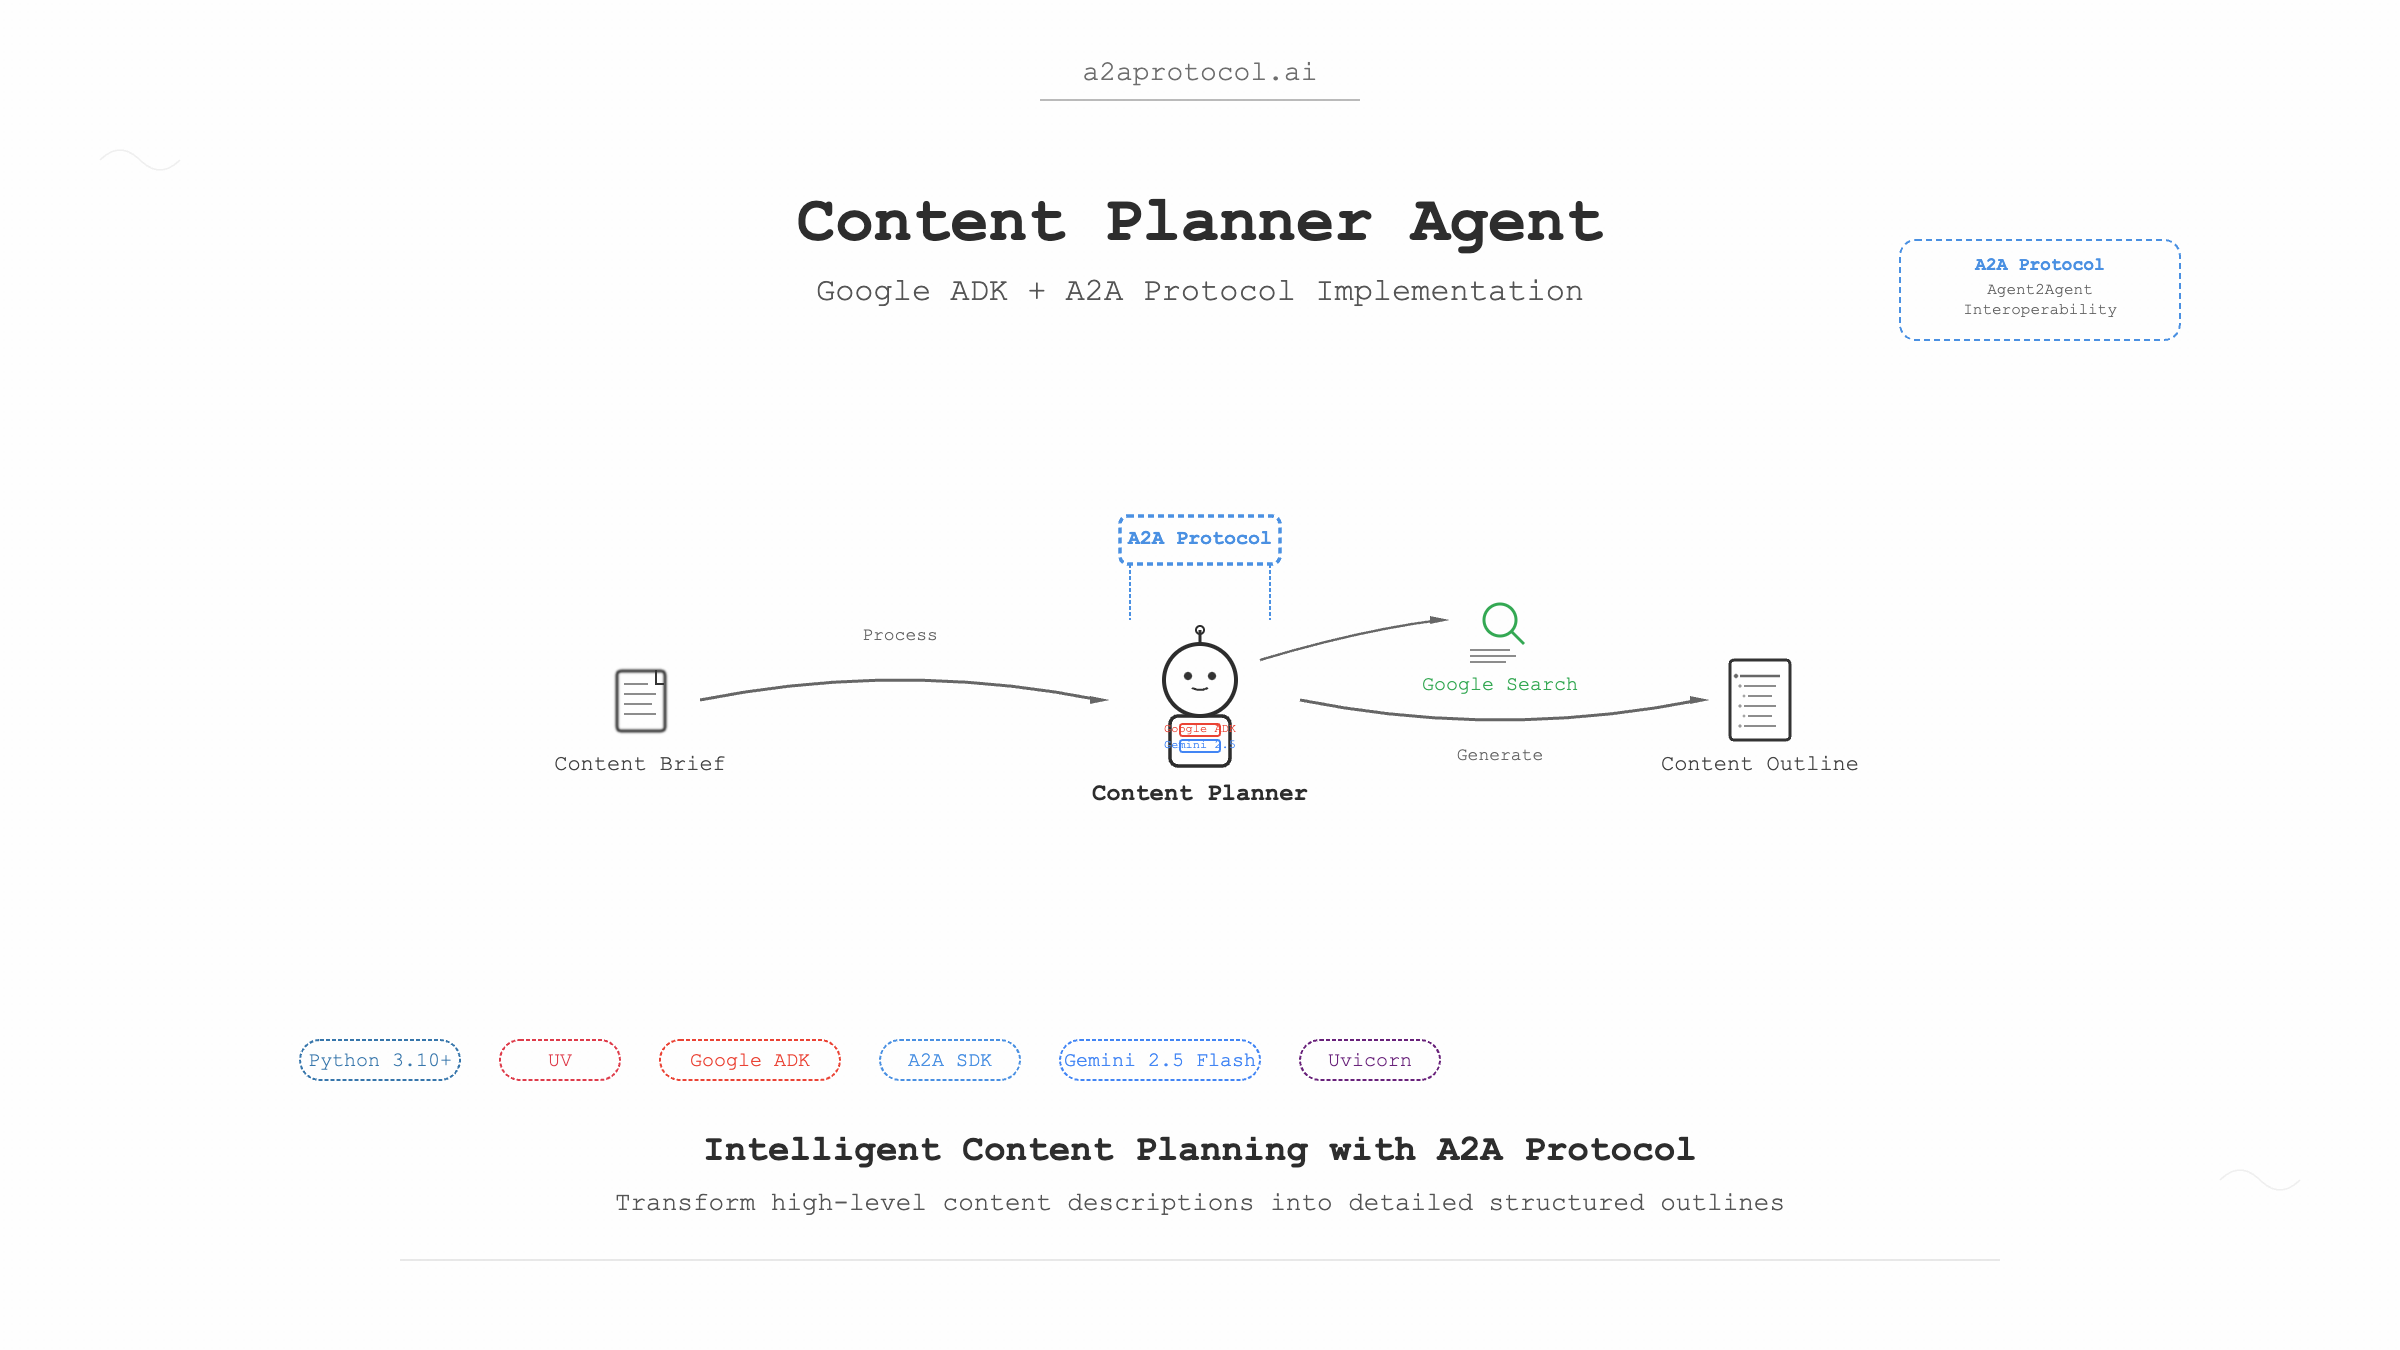
프로젝트 개요
콘텐츠 플래너 에이전트는 Google Agent Development Kit(ADK)와 Python A2A SDK를 기반으로 구축된 지능형 콘텐츠 계획 에이전트입니다. 이 에이전트는 고수준 콘텐츠 설명을 바탕으로 상세한 콘텐츠 개요를 생성할 수 있습니다.
A2A 프로토콜이란
A2A 프로토콜(Agent2Agent 프로토콜)은 AI 에이전트 전용으로 설계된 오픈 표준 프로토콜입니다. 핵심 목표는 서로 다른 플랫폼과 기술 스택 간의 에이전트 상호 운용성을 달성하여, 기반 기술에 관계없이 "동료"처럼 협력하여 작업을 완료할 수 있도록 하는 것입니다.
기술 스택
- Python: 3.10+
- UV: Python 패키지 매니저
- Google ADK: Google Agent Development Kit
- A2A SDK: Agent-to-Agent 통신 프로토콜
- Gemini 2.5 Flash: 대규모 언어 모델
- Google Search: 검색 도구
- Uvicorn: ASGI 서버
전제 조건
1. 환경 설정
시스템에 다음 소프트웨어가 설치되어 있는지 확인하세요:
# Python 버전 확인 (3.10+ 필요)
python --version

# UV 패키지 매니저 설치 (아직 설치되지 않은 경우)
curl -LsSf https://astral.sh/uv/install.sh | sh
# 또는 pip 사용
pip install uv
2. API 키
Gemini 모델과 Google Search 기능을 사용하기 위해 Google API 키를 획득해야 합니다:
- Google AI Studio 방문
- 새 API 키 생성
- 나중에 사용할 수 있도록 키 저장
프로젝트 구조
samples/python/agents/content_planner/
├── __init__.py                 # 패키지 초기화 파일
├── __main__.py                # 메인 엔트리 파일
├── agent_executor.py          # 에이전트 실행기
├── content_planner_agent.py   # 콘텐츠 플래너 에이전트 정의
├── pyproject.toml            # 프로젝트 구성 파일
├── requirements.txt          # 의존성 목록
├── .env.example             # 환경 변수 예제
└── README.md               # 프로젝트 문서
빠른 시작
1단계: 프로젝트 클론 및 디렉토리 이동
# a2a-samples 프로젝트를 이미 가지고 있다고 가정
git clone https://github.com/a2aproject/a2a-samples.git
cd a2a-samples/samples/python/agents/content_planner
2단계: 환경 변수 구성
# 환경 변수 예제 파일 복사
cp .env.example .env

# .env 파일을 편집하고 Google API 키 추가
echo "GOOGLE_API_KEY=your_actual_api_key_here" > .env
3단계: 의존성 설치 및 에이전트 실행
# UV를 사용하여 의존성 설치 및 프로젝트 실행
uv run .

# 참고:
"gradio>=5.30.0"는 현재 에이전트에서 필요하지 않습니다.
기본적으로 에이전트는 http://localhost:10001에서 시작됩니다.
4단계: 에이전트 테스트 (새 터미널 창)
# CLI 클라이언트 디렉토리로 이동
cd samples/python/hosts/cli

# 에이전트에 연결하고 메시지 전송
uv run . --agent http://localhost:10001
5단계: 에이전트와 상호작용
CLI 클라이언트에서 다음과 같은 메시지를 보낼 수 있습니다:
Create an outline for a short, upbeat, and encouraging X post about learning Java
코드 설명
1. 메인 엔트리 파일 (__main__.py)
@click.command()
@click.option("--host", default="localhost")
@click.option("--port", default=10001)
def main(host, port):
    # 에이전트 카드 (메타데이터)
    agent_card = AgentCard(
        name='Content Planner Agent',
        description=content_planner_agent.description,
        url=f'http://{host}:{port}',
        version="1.0.0",
        defaultInputModes=["text", "text/plain"],
        defaultOutputModes=["text", "text/plain"],
        capabilities=AgentCapabilities(streaming=True),
        skills=[
            AgentSkill(
                id="content_planner",
                name="Creates outlines for content",
                description="Creates outlines for content given a high-level description of the content",
                tags=["plan", "outline"],
                examples=[
                    "Create an outline for a short, upbeat, and encouraging X post about learning Java",
                ],
            )
        ],
    )
주요 구성 요소 설명:
- AgentCard: 이름, 설명, URL, 버전 등을 포함하는 에이전트 메타데이터 카드
- AgentSkill: ID, 이름, 설명, 태그, 예제를 포함하는 에이전트 스킬 정의
- AgentCapabilities: 스트리밍 지원과 같은 에이전트 기능 구성
2. 에이전트 정의 (content_planner_agent.py)
from google.adk.agents import Agent
from google.adk.tools import google_search

root_agent = Agent(
    name="content_planner_agent",
    model="gemini-2.5-flash",
    description=("Planning agent that creates a detailed and logical outline for a piece of content,"
                 "given a high-level description."),
    instruction=("You are an expert content planner. Your task is to create a detailed and logical outline for a piece"
                 "of content, given a high-level description."),
    tools=[google_search],
)
주요 기능:
- Model: 기반 LLM으로 Gemini 2.5 Flash 사용
- Tools: 관련 정보 검색을 위한 Google Search 도구 통합
- Instructions: 에이전트의 역할과 작업을 명확히 정의
3. 에이전트 실행기 (agent_executor.py)
class ADKAgentExecutor(AgentExecutor):
    def __init__(self, agent, status_message="Processing request...", artifact_name="response"):
        self.agent = agent
        self.status_message = status_message
        self.artifact_name = artifact_name
        self.runner = Runner(
            app_name=agent.name,
            agent=agent,
            artifact_service=InMemoryArtifactService(),
            session_service=InMemorySessionService(),
            memory_service=InMemoryMemoryService(),
        )
핵심 기능:
- Runner: 에이전트 실행을 관리하는 ADK 러너
- 서비스 구성 요소:
ArtifactService: 생성된 아티팩트 관리SessionService: 세션 상태 관리MemoryService: 대화 메모리 관리
시스템 아키텍처 플로우 차트
graph TB
    A[사용자 요청] --> B[A2A CLI 클라이언트]
    B --> C[HTTP 요청]
    C --> D[A2A Starlette 애플리케이션]
    D --> E[DefaultRequestHandler]
    E --> F[ADKAgentExecutor]
    F --> G[ADK Runner]
    G --> H[콘텐츠 플래너 에이전트]
    H --> I[Gemini 2.5 Flash 모델]
    H --> J[Google Search 도구]
    I --> K[콘텐츠 개요 생성]
    J --> K
    K --> L[응답 아티팩트]
    L --> M[작업 완료]
    M --> N[사용자에게 결과 반환]

    subgraph "ADK 구성 요소"
        O[InMemoryArtifactService]
        P[InMemorySessionService]
        Q[InMemoryMemoryService]
    end

    G --> O
    G --> P
    G --> Q
상세 실행 플로우
1. 초기화 단계
sequenceDiagram
    participant Main as __main__.py
    participant Agent as content_planner_agent
    participant Executor as ADKAgentExecutor
    participant Server as A2AStarletteApplication

    Main->>Agent: 에이전트 구성 로드
    Main->>Executor: 실행기 인스턴스 생성
    Main->>Server: A2A 서버 생성
    Server->>Server: Uvicorn 서버 시작
2. 요청 처리 단계
sequenceDiagram
    participant Client as CLI 클라이언트
    participant Server as A2A 서버
    participant Handler as DefaultRequestHandler
    participant Executor as ADKAgentExecutor
    participant Runner as ADK Runner
    participant Model as Gemini 2.5 Flash
    participant Search as Google Search

    Client->>Server: 콘텐츠 계획 요청 전송
    Server->>Handler: 요청 라우팅
    Handler->>Executor: 에이전트 작업 실행
    Executor->>Runner: ADK 러너 시작
    Runner->>Model: Gemini 모델 호출
    Runner->>Search: Google 검색 실행
    Model->>Runner: 생성된 콘텐츠 반환
    Search->>Runner: 검색 결과 반환
    Runner->>Executor: 결과 병합
    Executor->>Handler: 아티팩트 반환
    Handler->>Server: 작업 완료
    Server->>Client: 콘텐츠 개요 반환
고급 구성
사용자 정의 포트
# 지정된 포트에서 에이전트 시작
uv run . --port=8080
사용자 정의 호스트
# 지정된 호스트와 포트에서 시작
uv run . --host=0.0.0.0 --port=8080
환경 변수 구성
.env 파일에서 더 많은 옵션을 구성할 수 있습니다:
GOOGLE_API_KEY=your_api_key_here
# 다른 구성 항목을 추가할 수 있습니다
LOG_LEVEL=INFO
문제 해결
일반적인 문제
-
API 키 오류
오류: Invalid API key 해결책: .env 파일의 GOOGLE_API_KEY가 올바른지 확인 -
포트가 이미 사용 중
오류: Port 10001 is already in use 해결책: --port 매개변수를 사용하여 다른 포트 지정 -
의존성 설치 실패
오류: Failed to install dependencies
해결책: UV가 올바르게 설치되었는지 확인, uv sync 시도
확장 및 사용자 정의
새 도구 추가
content_planner_agent.py에서 새 도구 추가:
from google.adk.tools import google_search, web_search

root_agent = Agent(
    # ... 기타 구성
    tools=[google_search, web_search],  # 더 많은 도구 추가
)
모델 수정
root_agent = Agent(
    name="content_planner_agent",
    model="gemini-1.5-pro",  # 다른 모델 사용
    # ... 기타 구성
)
사용자 정의 지침
root_agent = Agent(
    # ... 기타 구성
    instruction=(
        "당신은 기술 문서 전문 콘텐츠 플래너입니다. "
        "코드 예제와 모범 사례를 포함한 상세한 개요를 작성하세요."
    ),
)
모범 사례
-
보안:
- API 키는 항상 환경 변수에 저장
.env파일을 버전 관리에 커밋하지 않음
-
성능 최적화:
- 적절한 모델 크기 사용
- 메모리 및 세션 서비스를 적절히 구성
-
오류 처리:
- 적절한 오류 처리 및 로깅 구현
- 의미 있는 오류 메시지 제공
-
테스트:
- 단위 테스트 및 통합 테스트 작성
- 다양한 입력으로 에이전트 응답 테스트
요약
콘텐츠 플래너 에이전트는 Google ADK와 A2A 프로토콜을 사용하여 지능형 에이전트를 구축하는 방법을 보여줍니다. 이 가이드를 통해 다음을 할 수 있어야 합니다:
- 전체 프로젝트 아키텍처 이해
- 에이전트를 성공적으로 실행 및 테스트
- 필요에 따라 사용자 정의 및 확장
- 일반적인 문제 해결
이 에이전트는 완전한 콘텐츠 생성 워크플로우와 같은 더 복잡한 멀티 에이전트 시스템을 구축하기 위한 기반으로 사용할 수 있습니다.
더 많은 A2A 프로토콜 예제
Featured Products
Tools and services from the A2A ecosystem directory.
HowHeight is the most powerful free visual height comparison tool for people, animals, objects, and characters, with charts in cm and ft + in.
Turn complex PDFs into clean Markdown that people can review and AI tools can use.
Create powerful Discord bots with AI. The easiest no-code bot maker for moderation, music, leveling, and custom commands.

Related Articles
Explore more content related to this topic
Implementing A2A Agents with ADK: Complete Development Guide
This guide provides a detailed introduction on how to use Google ADK (Agent Development Kit) framework to implement A2A (Agent2Agent Protocol) intelligent agent systems. From environment setup, project structure design to server-side and client-side agent development, covering the complete development process to help developers quickly build intelligent agent applications that support distributed communication.
A2A ADK Expense Reimbursement Agent
An intelligent expense reimbursement agent based on Google ADK and A2A protocol that automatically generates forms to supplement missing information and streamlines the reimbursement process.
A2UI Introduction - Declarative UI Protocol for Agent-Driven Interfaces
Discover A2UI, the declarative UI protocol that enables AI agents to generate rich, interactive user interfaces. Learn how A2UI works, who it's for, how to use it, and see real-world examples from Google Opal, Gemini Enterprise, and Flutter GenUI SDK.
Agent Gateway Protocol (AGP): Practical Tutorial and Specification
Learn the Agent Gateway Protocol (AGP): what it is, problems it solves, core spec (capability announcements, intent payloads, routing and error codes), routing algorithm, and how to run a working simulation.
Integrating A2A Protocol - Intelligent Agent Communication Solution for BeeAI Framework
Using A2A protocol instead of ACP is a better choice for BeeAI, reducing protocol fragmentation and improving ecosystem integration.