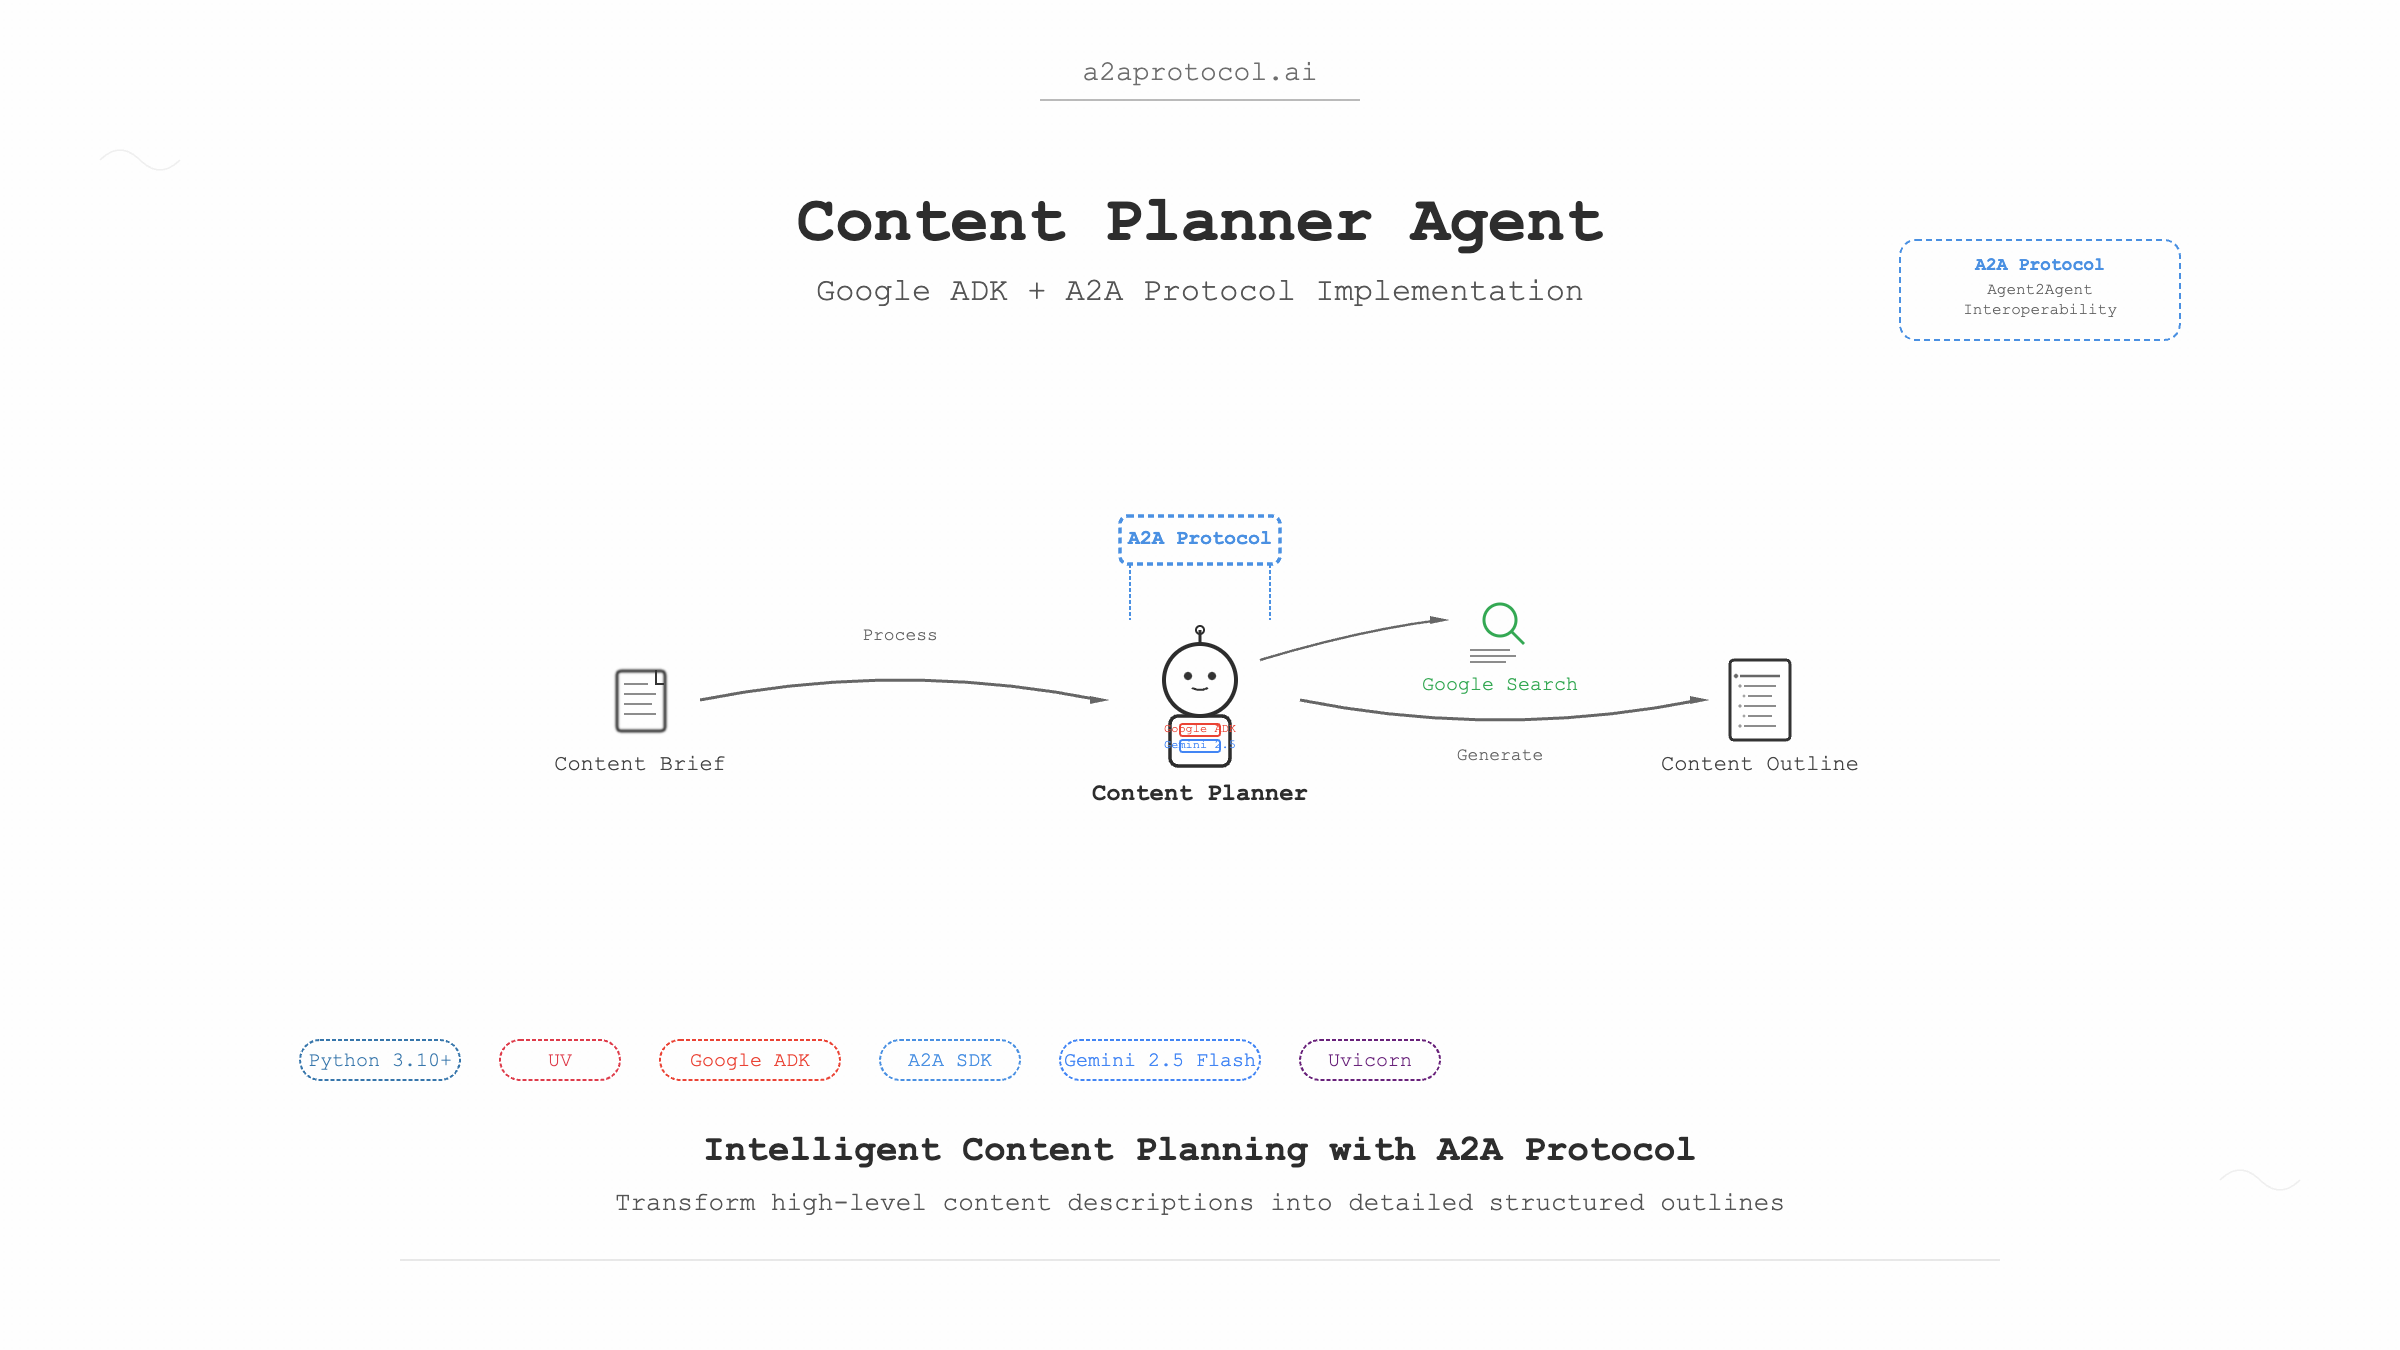
プロジェクト概要
コンテンツプランナーエージェントは、Google Agent Development Kit(ADK)とPython A2A SDKに基づいて構築されたインテリジェントなコンテンツプランニングエージェントです。このエージェントは、高レベルなコンテンツ記述に基づいて詳細なコンテンツアウトラインを作成できます。
A2Aプロトコルとは
A2Aプロトコル(Agent2Agentプロトコル)は、AIエージェント専用に設計されたオープンスタンダードプロトコルです。その核心的な目標は、異なるプラットフォームや技術スタック間でのエージェントの相互運用性を実現し、基盤技術に関係なく「同僚」のように協力してタスクを完了できるようにすることです。
技術スタック
- Python: 3.10+
- UV: Pythonパッケージマネージャー
- Google ADK: Google Agent Development Kit
- A2A SDK: Agent-to-Agent通信プロトコル
- Gemini 2.5 Flash: 大規模言語モデル
- Google Search: 検索ツール
- Uvicorn: ASGIサーバー
前提条件
1. 環境セットアップ
システムに以下のソフトウェアがインストールされていることを確認してください:
# Pythonバージョンを確認(3.10+が必要)
python --version

# UVパッケージマネージャーをインストール(まだインストールされていない場合)
curl -LsSf https://astral.sh/uv/install.sh | sh
# またはpipを使用
pip install uv
2. APIキー
GeminiモデルとGoogle Search機能を使用するためにGoogle APIキーを取得する必要があります:
- Google AI Studioにアクセス
- 新しいAPIキーを作成
- 後で使用するためにキーを保存
プロジェクト構造
samples/python/agents/content_planner/
├── __init__.py                 # パッケージ初期化ファイル
├── __main__.py                # メインエントリーファイル
├── agent_executor.py          # エージェントエグゼキューター
├── content_planner_agent.py   # コンテンツプランナーエージェント定義
├── pyproject.toml            # プロジェクト設定ファイル
├── requirements.txt          # 依存関係リスト
├── .env.example             # 環境変数の例
└── README.md               # プロジェクトドキュメント
クイックスタート
ステップ1: プロジェクトをクローンしてディレクトリに移動
# a2a-samplesプロジェクトを既に持っていると仮定
git clone https://github.com/a2aproject/a2a-samples.git
cd a2a-samples/samples/python/agents/content_planner
ステップ2: 環境変数を設定
# 環境変数の例ファイルをコピー
cp .env.example .env

# .envファイルを編集してGoogle APIキーを追加
echo "GOOGLE_API_KEY=your_actual_api_key_here" > .env
ステップ3: 依存関係をインストールしてエージェントを実行
# UVを使用して依存関係をインストールしプロジェクトを実行
uv run .

# 注意:
"gradio>=5.30.0"は現在のエージェントでは不要です。
デフォルトでは、エージェントはhttp://localhost:10001で開始されます。
ステップ4: エージェントをテスト(新しいターミナルウィンドウ)
# CLIクライアントディレクトリに移動
cd samples/python/hosts/cli

# エージェントに接続してメッセージを送信
uv run . --agent http://localhost:10001
ステップ5: エージェントとの対話
CLIクライアントで、以下のようなメッセージを送信できます:
Create an outline for a short, upbeat, and encouraging X post about learning Java
コード解説
1. メインエントリーファイル(__main__.py)
@click.command()
@click.option("--host", default="localhost")
@click.option("--port", default=10001)
def main(host, port):
    # エージェントカード(メタデータ)
    agent_card = AgentCard(
        name='Content Planner Agent',
        description=content_planner_agent.description,
        url=f'http://{host}:{port}',
        version="1.0.0",
        defaultInputModes=["text", "text/plain"],
        defaultOutputModes=["text", "text/plain"],
        capabilities=AgentCapabilities(streaming=True),
        skills=[
            AgentSkill(
                id="content_planner",
                name="Creates outlines for content",
                description="Creates outlines for content given a high-level description of the content",
                tags=["plan", "outline"],
                examples=[
                    "Create an outline for a short, upbeat, and encouraging X post about learning Java",
                ],
            )
        ],
    )
主要コンポーネントの説明:
- AgentCard: 名前、説明、URL、バージョンなどを含むエージェントメタデータカード
- AgentSkill: ID、名前、説明、タグ、例を含むエージェントスキルの定義
- AgentCapabilities: ストリーミングサポートなどのエージェント機能設定
2. エージェント定義(content_planner_agent.py)
from google.adk.agents import Agent
from google.adk.tools import google_search

root_agent = Agent(
    name="content_planner_agent",
    model="gemini-2.5-flash",
    description=("Planning agent that creates a detailed and logical outline for a piece of content,"
                 "given a high-level description."),
    instruction=("You are an expert content planner. Your task is to create a detailed and logical outline for a piece"
                 "of content, given a high-level description."),
    tools=[google_search],
)
主要機能:
- Model: 基盤LLMとしてGemini 2.5 Flashを使用
- Tools: 関連情報取得のためのGoogle Searchツールを統合
- Instructions: エージェントの役割とタスクを明確に定義
3. エージェントエグゼキューター(agent_executor.py)
class ADKAgentExecutor(AgentExecutor):
    def __init__(self, agent, status_message="Processing request...", artifact_name="response"):
        self.agent = agent
        self.status_message = status_message
        self.artifact_name = artifact_name
        self.runner = Runner(
            app_name=agent.name,
            agent=agent,
            artifact_service=InMemoryArtifactService(),
            session_service=InMemorySessionService(),
            memory_service=InMemoryMemoryService(),
        )
核心機能:
- Runner: エージェント実行を管理するADKランナー
- サービスコンポーネント:
ArtifactService: 生成されたアーティファクトを管理SessionService: セッション状態を管理MemoryService: 会話メモリを管理
システムアーキテクチャフローチャート
graph TB
    A[ユーザーリクエスト] --> B[A2A CLIクライアント]
    B --> C[HTTPリクエスト]
    C --> D[A2A Starletteアプリケーション]
    D --> E[DefaultRequestHandler]
    E --> F[ADKAgentExecutor]
    F --> G[ADK Runner]
    G --> H[コンテンツプランナーエージェント]
    H --> I[Gemini 2.5 Flashモデル]
    H --> J[Google Searchツール]
    I --> K[コンテンツアウトライン生成]
    J --> K
    K --> L[レスポンスアーティファクト]
    L --> M[タスク完了]
    M --> N[ユーザーに結果を返す]

    subgraph "ADKコンポーネント"
        O[InMemoryArtifactService]
        P[InMemorySessionService]
        Q[InMemoryMemoryService]
    end

    G --> O
    G --> P
    G --> Q
詳細実行フロー
1. 初期化フェーズ
sequenceDiagram
    participant Main as __main__.py
    participant Agent as content_planner_agent
    participant Executor as ADKAgentExecutor
    participant Server as A2AStarletteApplication

    Main->>Agent: エージェント設定をロード
    Main->>Executor: エグゼキューターインスタンスを作成
    Main->>Server: A2Aサーバーを作成
    Server->>Server: Uvicornサーバーを開始
2. リクエスト処理フェーズ
sequenceDiagram
    participant Client as CLIクライアント
    participant Server as A2Aサーバー
    participant Handler as DefaultRequestHandler
    participant Executor as ADKAgentExecutor
    participant Runner as ADK Runner
    participant Model as Gemini 2.5 Flash
    participant Search as Google Search

    Client->>Server: コンテンツプランニングリクエストを送信
    Server->>Handler: リクエストをルーティング
    Handler->>Executor: エージェントタスクを実行
    Executor->>Runner: ADKランナーを開始
    Runner->>Model: Geminiモデルを呼び出し
    Runner->>Search: Google検索を実行
    Model->>Runner: 生成されたコンテンツを返す
    Search->>Runner: 検索結果を返す
    Runner->>Executor: 結果をマージ
    Executor->>Handler: アーティファクトを返す
    Handler->>Server: タスクを完了
    Server->>Client: コンテンツアウトラインを返す
高度な設定
カスタムポート
# 指定されたポートでエージェントを開始
uv run . --port=8080
カスタムホスト
# 指定されたホストとポートで開始
uv run . --host=0.0.0.0 --port=8080
環境変数設定
.envファイルでより多くのオプションを設定できます:
GOOGLE_API_KEY=your_api_key_here
# 他の設定項目を追加できます
LOG_LEVEL=INFO
トラブルシューティング
よくある問題
-
APIキーエラー
エラー: Invalid API key 解決策: .envファイルのGOOGLE_API_KEYが正しいか確認 -
ポートが既に使用中
エラー: Port 10001 is already in use 解決策: --portパラメータを使用して別のポートを指定 -
依存関係のインストール失敗
エラー: Failed to install dependencies
解決策: UVが正しくインストールされていることを確認、uv syncを試す
拡張とカスタマイズ
新しいツールの追加
content_planner_agent.pyで新しいツールを追加:
from google.adk.tools import google_search, web_search

root_agent = Agent(
    # ... その他の設定
    tools=[google_search, web_search],  # より多くのツールを追加
)
モデルの変更
root_agent = Agent(
    name="content_planner_agent",
    model="gemini-1.5-pro",  # 異なるモデルを使用
    # ... その他の設定
)
カスタム指示
root_agent = Agent(
    # ... その他の設定
    instruction=(
        "あなたは技術文書専門のコンテンツプランナーです。"
        "コード例とベストプラクティスを含む詳細なアウトラインを作成してください。"
    ),
)
ベストプラクティス
-
セキュリティ:
- APIキーは常に環境変数に保存
.envファイルをバージョン管理にコミットしない
-
パフォーマンス最適化:
- 適切なモデルサイズを使用
- メモリとセッションサービスを適切に設定
-
エラーハンドリング:
- 適切なエラーハンドリングとログを実装
- 意味のあるエラーメッセージを提供
-
テスト:
- ユニットテストと統合テストを作成
- 異なる入力でエージェントの応答をテスト
まとめ
コンテンツプランナーエージェントは、Google ADKとA2Aプロトコルを使用してインテリジェントなエージェントを構築する方法を示しています。このガイドを通じて、以下ができるようになります:
- プロジェクト全体のアーキテクチャを理解
- エージェントを正常に実行およびテスト
- 必要に応じてカスタマイズと拡張
- よくある問題を解決
このエージェントは、完全なコンテンツ作成ワークフローなど、より複雑なマルチエージェントシステムを構築するための基盤として使用できます。
その他のA2Aプロトコル例
Featured Products
Tools and services from the A2A ecosystem directory.

HowHeight is the most powerful free visual height comparison tool for people, animals, objects, and characters, with charts in cm and ft + in.
Turn complex PDFs into clean Markdown that people can review and AI tools can use.
Create powerful Discord bots with AI. The easiest no-code bot maker for moderation, music, leveling, and custom commands.
Related Articles
Explore more content related to this topic
Implementing A2A Agents with ADK: Complete Development Guide
This guide provides a detailed introduction on how to use Google ADK (Agent Development Kit) framework to implement A2A (Agent2Agent Protocol) intelligent agent systems. From environment setup, project structure design to server-side and client-side agent development, covering the complete development process to help developers quickly build intelligent agent applications that support distributed communication.
A2A ADK Expense Reimbursement Agent
An intelligent expense reimbursement agent based on Google ADK and A2A protocol that automatically generates forms to supplement missing information and streamlines the reimbursement process.
A2UI Introduction - Declarative UI Protocol for Agent-Driven Interfaces
Discover A2UI, the declarative UI protocol that enables AI agents to generate rich, interactive user interfaces. Learn how A2UI works, who it's for, how to use it, and see real-world examples from Google Opal, Gemini Enterprise, and Flutter GenUI SDK.
Agent Gateway Protocol (AGP): Practical Tutorial and Specification
Learn the Agent Gateway Protocol (AGP): what it is, problems it solves, core spec (capability announcements, intent payloads, routing and error codes), routing algorithm, and how to run a working simulation.
Integrating A2A Protocol - Intelligent Agent Communication Solution for BeeAI Framework
Using A2A protocol instead of ACP is a better choice for BeeAI, reducing protocol fragmentation and improving ecosystem integration.